Guide for Android's Data Persistence Library - Room Database
Storing data locally is pretty much simple!


Last updated on February 12, 2023
This blog further moves with Kotlin for examples with Room-DB
Introduction
Storing data locally is one of the most important yet necessary things to do when building an application for mobile devices.
That's where
Room,Realm, or any other data-persistence libraries play a major role when building an app for a mobile device.Roomis built uponSQLite, which also means that we need to handle the database withSQL-based queries, asSQLiteusesSQLfor querying with the database.
Why Room-DB?
Roomchecks SQL queries at compile time rather than runtime, which makes it easier to fix the queries before they are executed in the runtime.Most of the work with
Roomcan be done by annotations, which makes it even simpler while reducing boilerplate code while building a local database.
Setup-ing Room
Add the following dependencies to your build.gradle file:
apply plugin: 'kotlin-kapt'
...
dependencies {
    implementation 'org.jetbrains.kotlinx:kotlinx-coroutines-core:1.6.4'
    implementation 'org.jetbrains.kotlinx:kotlinx-coroutines-android:1.6.4'
...
def room_version = "2.5.0"
    implementation "androidx.room:room-runtime:$room_version"
    implementation "androidx.room:room-ktx:$room_version"
    annotationProcessor "androidx.room:room-compiler:$room_version"
    kapt "androidx.room:room-compiler:$room_version"
}
and of course, apply changes by an hour taking gradle sync
Implementation of Room, ofc
Roomrequires three major components when working with it:Entity - Entity represents the tables in our local SQL-based database.
Dao — Dao holds all the queries you’ll be doing with your database, it may be adding, deleting, updating, reading the existing data, or could be any query you want to do.
An abstract class that extends
RoomDatabase- This is the primary point for accessing the actual database which exists locally in a device, this class needs to be abstract asRoomadds further required code to implement your database without fail.
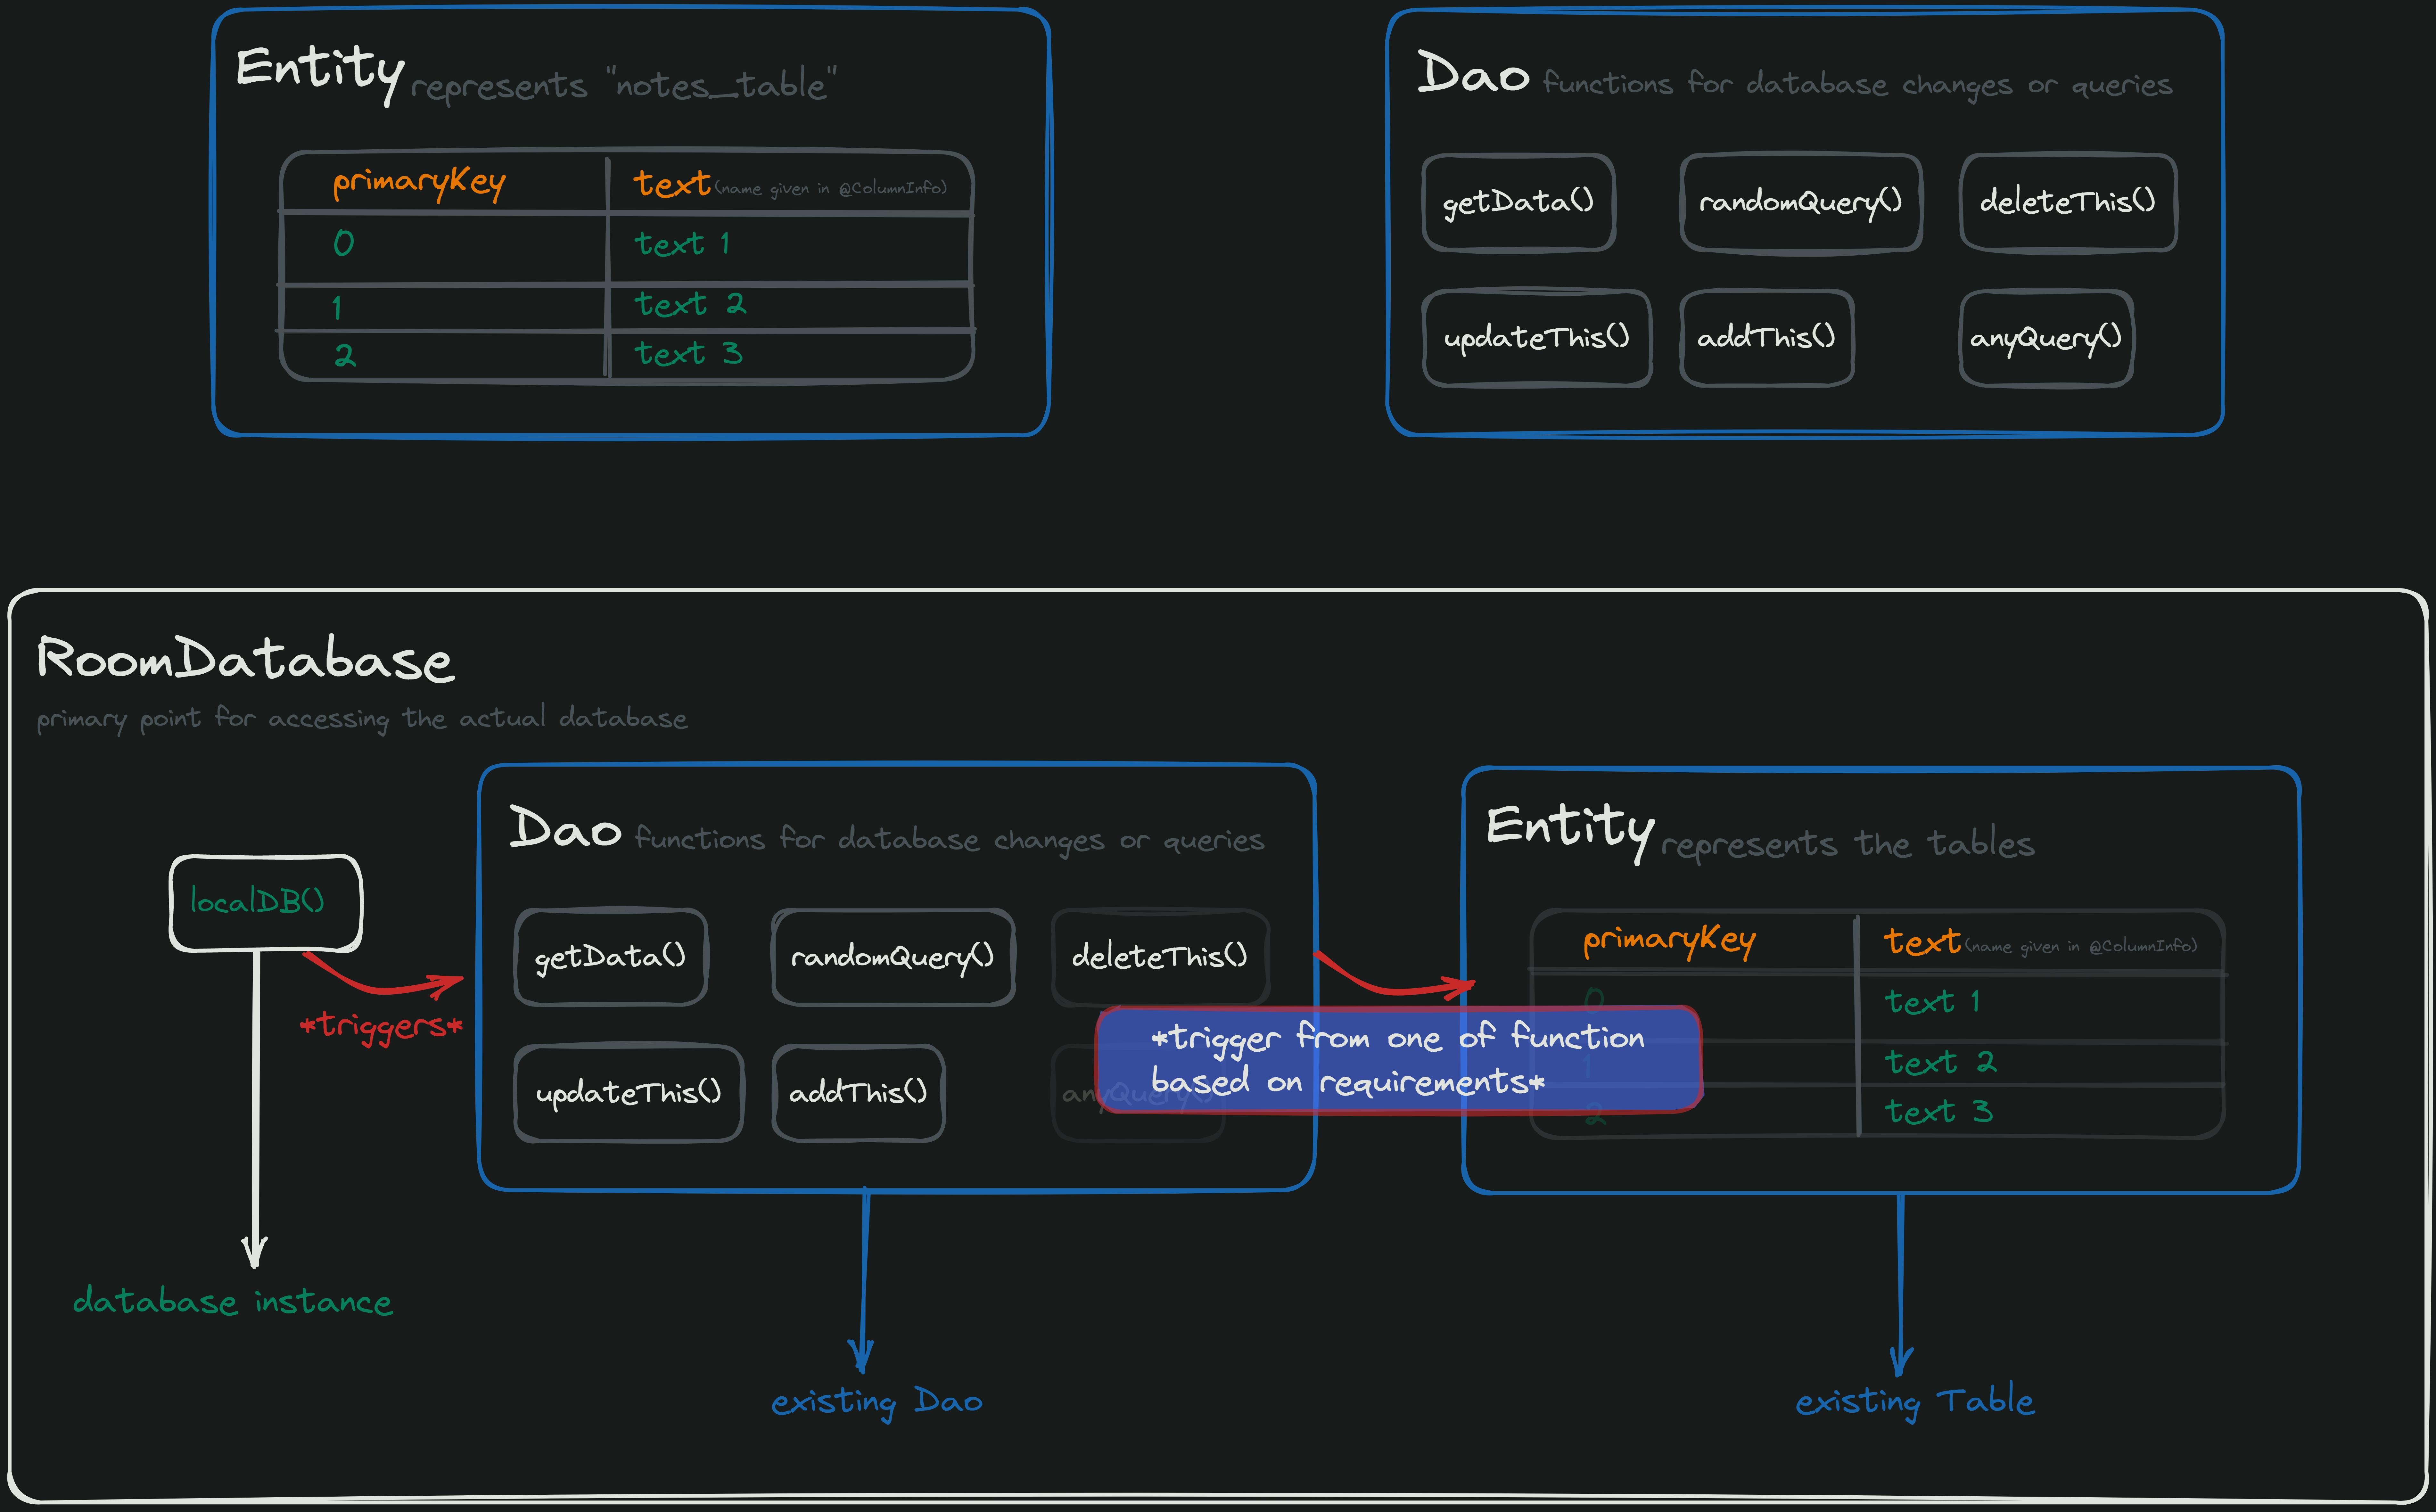
For representation, these three major components in a rough idea of working with Room will look like this:
Creating an Entity or a table
You can use
data classin Kotlin for creating a table orEntityfor storing the data based on requirements.When creating tables, it is necessary to mark the
data classas@Entityso thatRoomknows that this is the specific table where the given data should be added in acolumn.
Few Annotations you need to know while working with an Entity or a table :
@PrimaryKey- As the name says, this can be used to query or to indicate a respective column and its respective row's data as this annotation acts as the primary key for a column and its row.@Entity- As I've already mentioned, this can be used to define adata classas a table, and it also takes a parameter named "tablename"; where you can define a unique name from which you can do further database changes or queries based on this table name using SQL queries.@ColumnInfo- This can be used to define the metadata of a column.@ColumnInfotakes a parameter named "name," which can be used to define a column's name irrespective of its corresponding variable name; you can assume it as@SerialNameinkotlinx.serializationwhere the name you give may not match with the variable, but it triggers the respective name you give in@SerialNameas a parameter.
Example for creating an Entity or a table:
@Entity(tableName="notes_table") // define a unique name for table
data class NotesDBDTO(
    @ColumnInfo(name = "text") /* column's name irrespective of variable name*/
    val _data: String,
    @PrimaryKey // primary key for a column and its row
    val primaryKey: Int
)
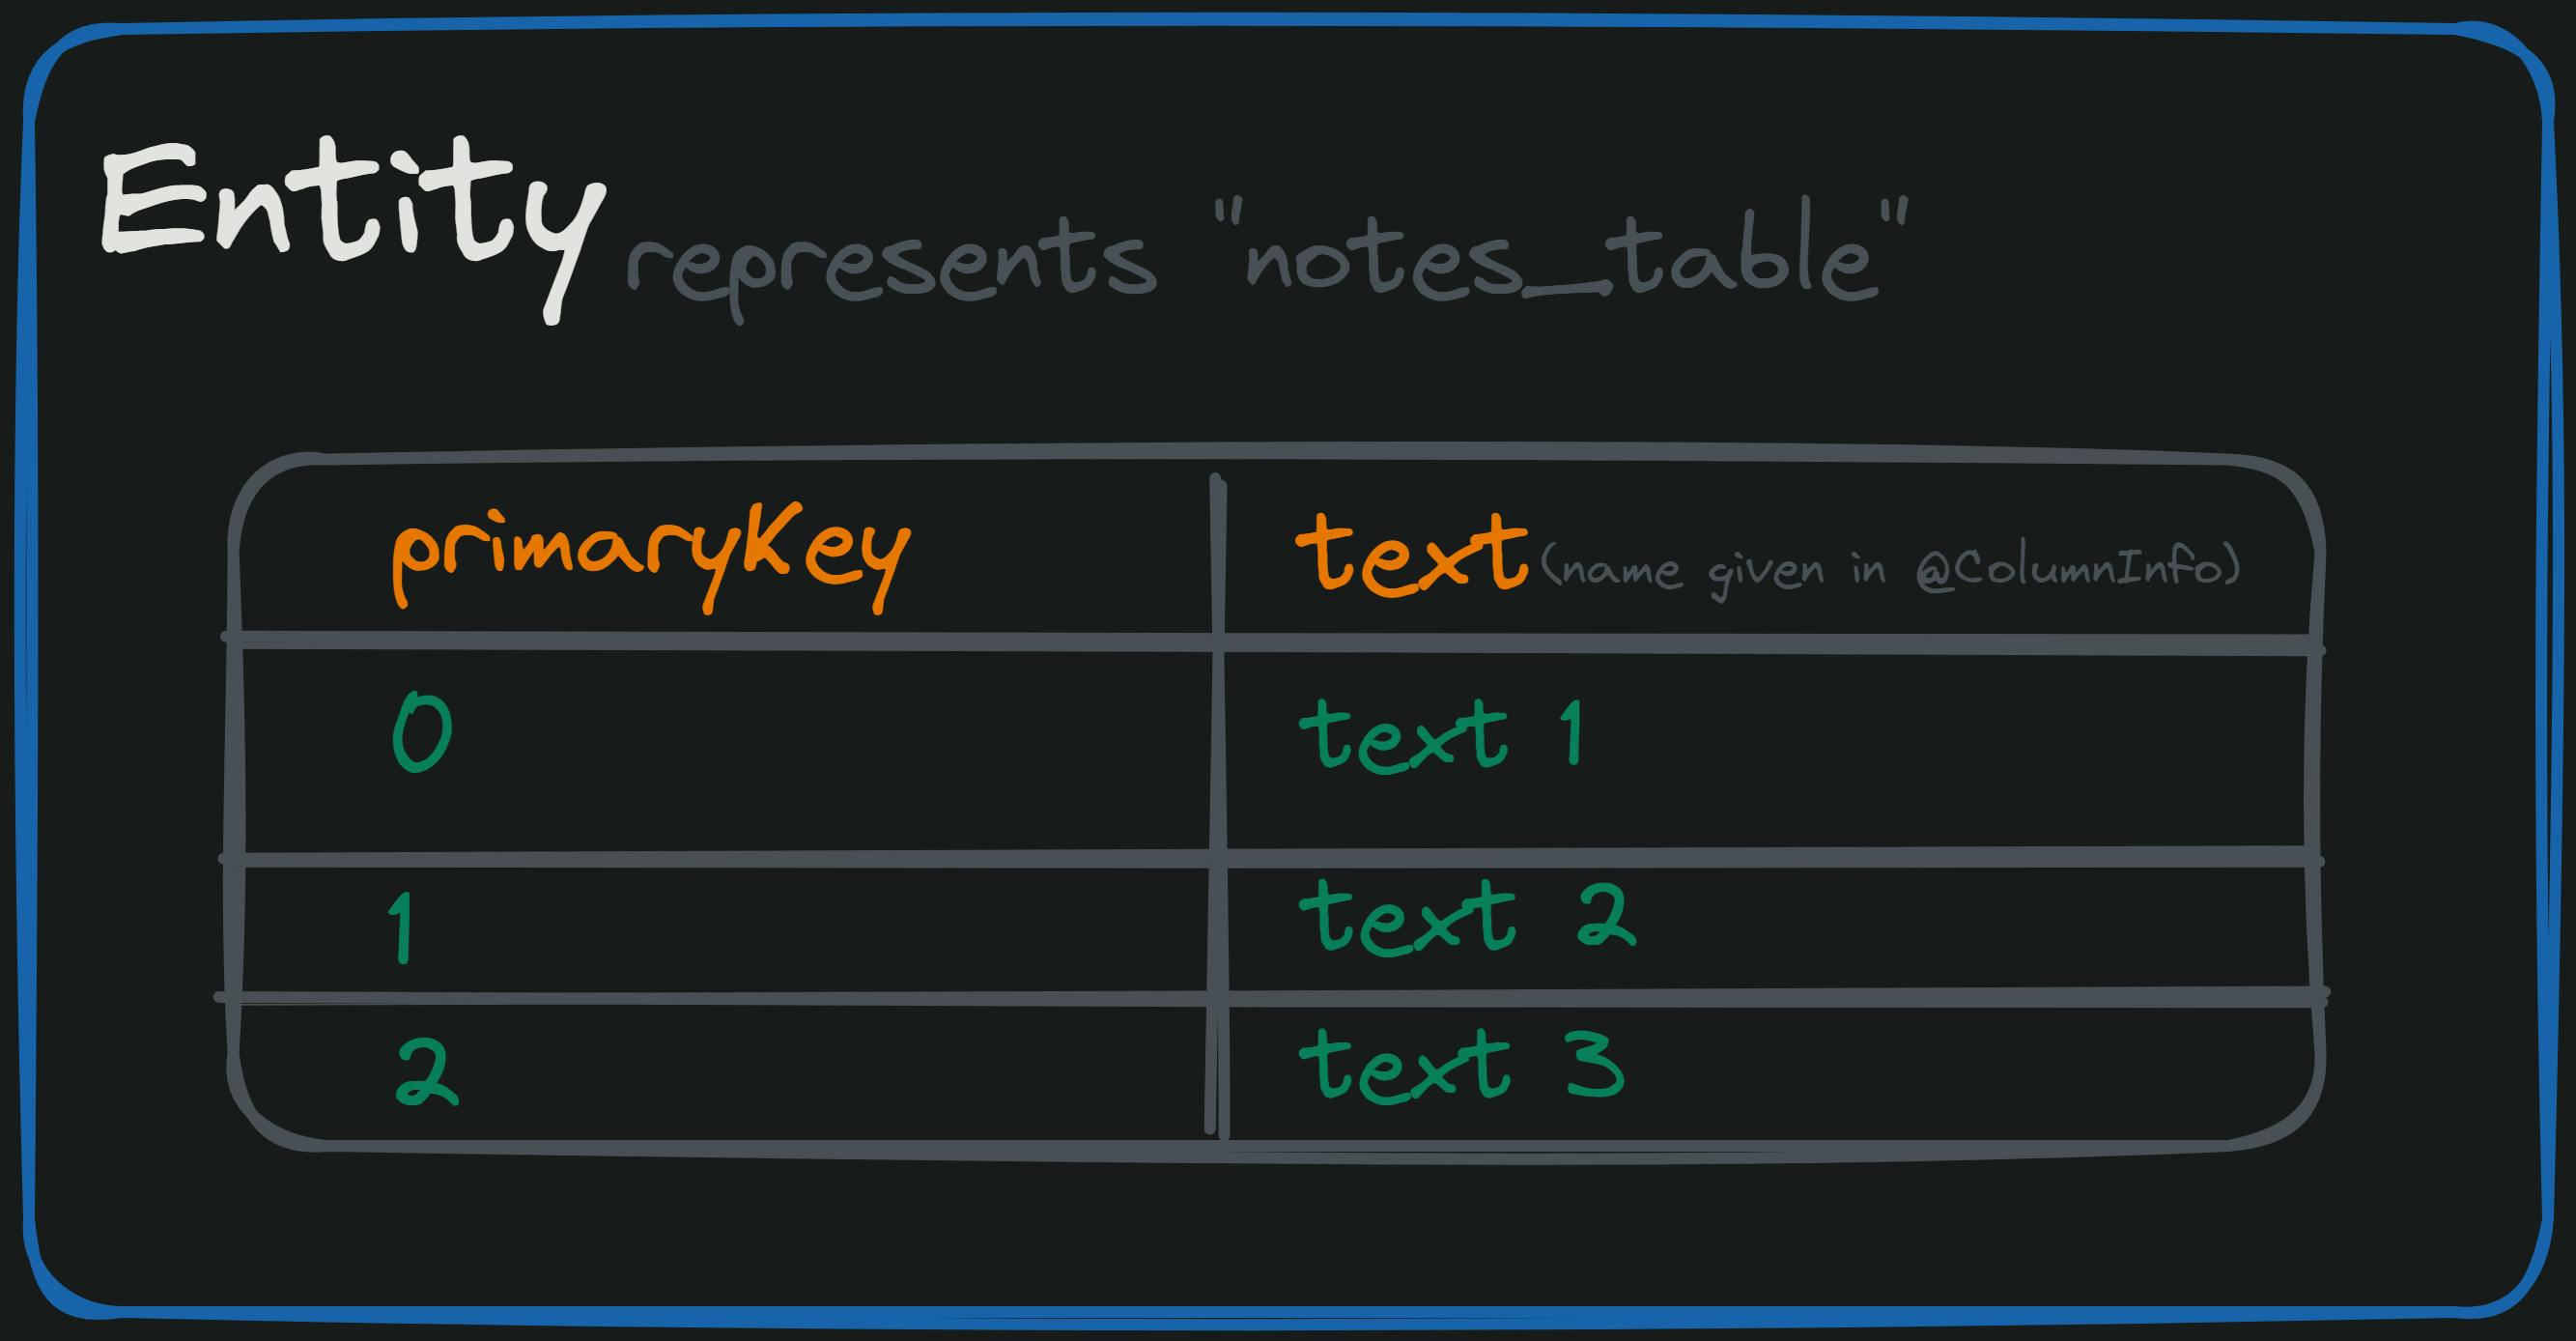
For representation, the above code, which represents the table, will look like this:
Creating Dao (Data Access Object)
You can use
interfacein Kotlin for creating aDaowhile working withRoom.You need to mark the
interfaceas@Dao, where you need to define the functions of the queries you want to do with the database; it may be anything related to changes in the database or queries; the functions for those can be added within this interface.
Few Annotations you need to know while working with @Dao :
@Insert- This annotation can be used to insert data or to create new data in the table.@Update: As the name itself says, this annotation can be used to update existing data based on the respective primary key.@Delete- Of course, you guessed it right. This annotation can be used to delete an existing row in a table based on the primary key.@Query- This annotation is quite powerful, as it gives you most of the database control you need; you can pretty much do everything with this single annotation based on SQL queries.
Room will generate the required SQL statements while working with @Insert, @Update, and @Delete annotations. Also, Room uses @PrimaryKey for updating or deleting the data while using annotations.
Example for creating Dao:
@Dao
interface DBDao {

    /*
    You can use annotations directly or can use SQL queries for making CRUD operations, either way things work!
    */

    @Query("SELECT * FROM notes_table") /* SQL query for getting all notes from the db*/
    fun getAllNotes(): Flow<List<NotesDBDTO>>

    @Insert /* Make sure to add the annotation in order to add the new notes when required*/
    suspend fun addNewNote(notesDBDTO: NotesDBDTO)

    @Update /* Make sure to add the annotation in order to add the update the existing notes*/
    suspend fun updateExistingNote(notesDBDTO: NotesDBDTO)

    @Delete
    suspend fun deleteNote(notesDBDTO: NotesDBDTO)
}
For representation, the above code, which represents the Dao, will look like this:

Creating RoomDatabase
As I've already mentioned that this is the primary point for accessing the actual database which exists locally in a device, this class needs to be abstract as
Roomadds further required code to implement your database without fail.You need to mark this particular abstract class, which extends
RoomDatabase,with@Database,which takes two parameters: "entities" and "version," where you need to pass the names of all entities that exist in your project and the version number, respectively.
The code may look like this:
@Database(entities = [NotesDBDTO::class], version = 1)
abstract class DataBase : RoomDatabase() {
...
}
We need to make database transactions; in other words, database connections should be in a singleton manner, as it would work as a single source that can be retrieved from anywhere in the application.
- Now, we need to check if any database already exists or not; if a database already exists, we'll just return our
@Dao, from which further queries or others can be done as per requirement; if a database doesn't exist, we'll create one and then return the@Dao.
The code may look like this:
@Database(entities = [NotesDBDTO::class], version = 1)
abstract class DataBase : RoomDatabase() { // Make sure you've marked this as abstract because room will generate further code

    abstract fun localDBData(): DBDao // Make sure you've marked this as abstract because room will generate further code

    companion object {
        @Volatile // this annotation ensures that the value of a variable is always up-to-date; it will always be read from memory instead from the cached
        private var db: DataBase? = null
        fun getLocalDB(context: Context): DataBase {
            return db
                ?: synchronized(this) {
                    val roomDBInstance = Room.databaseBuilder(
                        context.applicationContext,
                        DataBase::class.java,
                        "notes_db"
                    ).build()
                    db = roomDBInstance // Line I
                    return roomDBInstance
                }
        }
    }
}
Explanation for Line I from the above code:
- If a database already exists,
dbgets returned, but if that's not the case, a new instance of the database gets created, and the newly created database instance will be replaced by the null value ofdb, which makes the nextgetLocalDB()function triggers thedbbut not to create new instances.
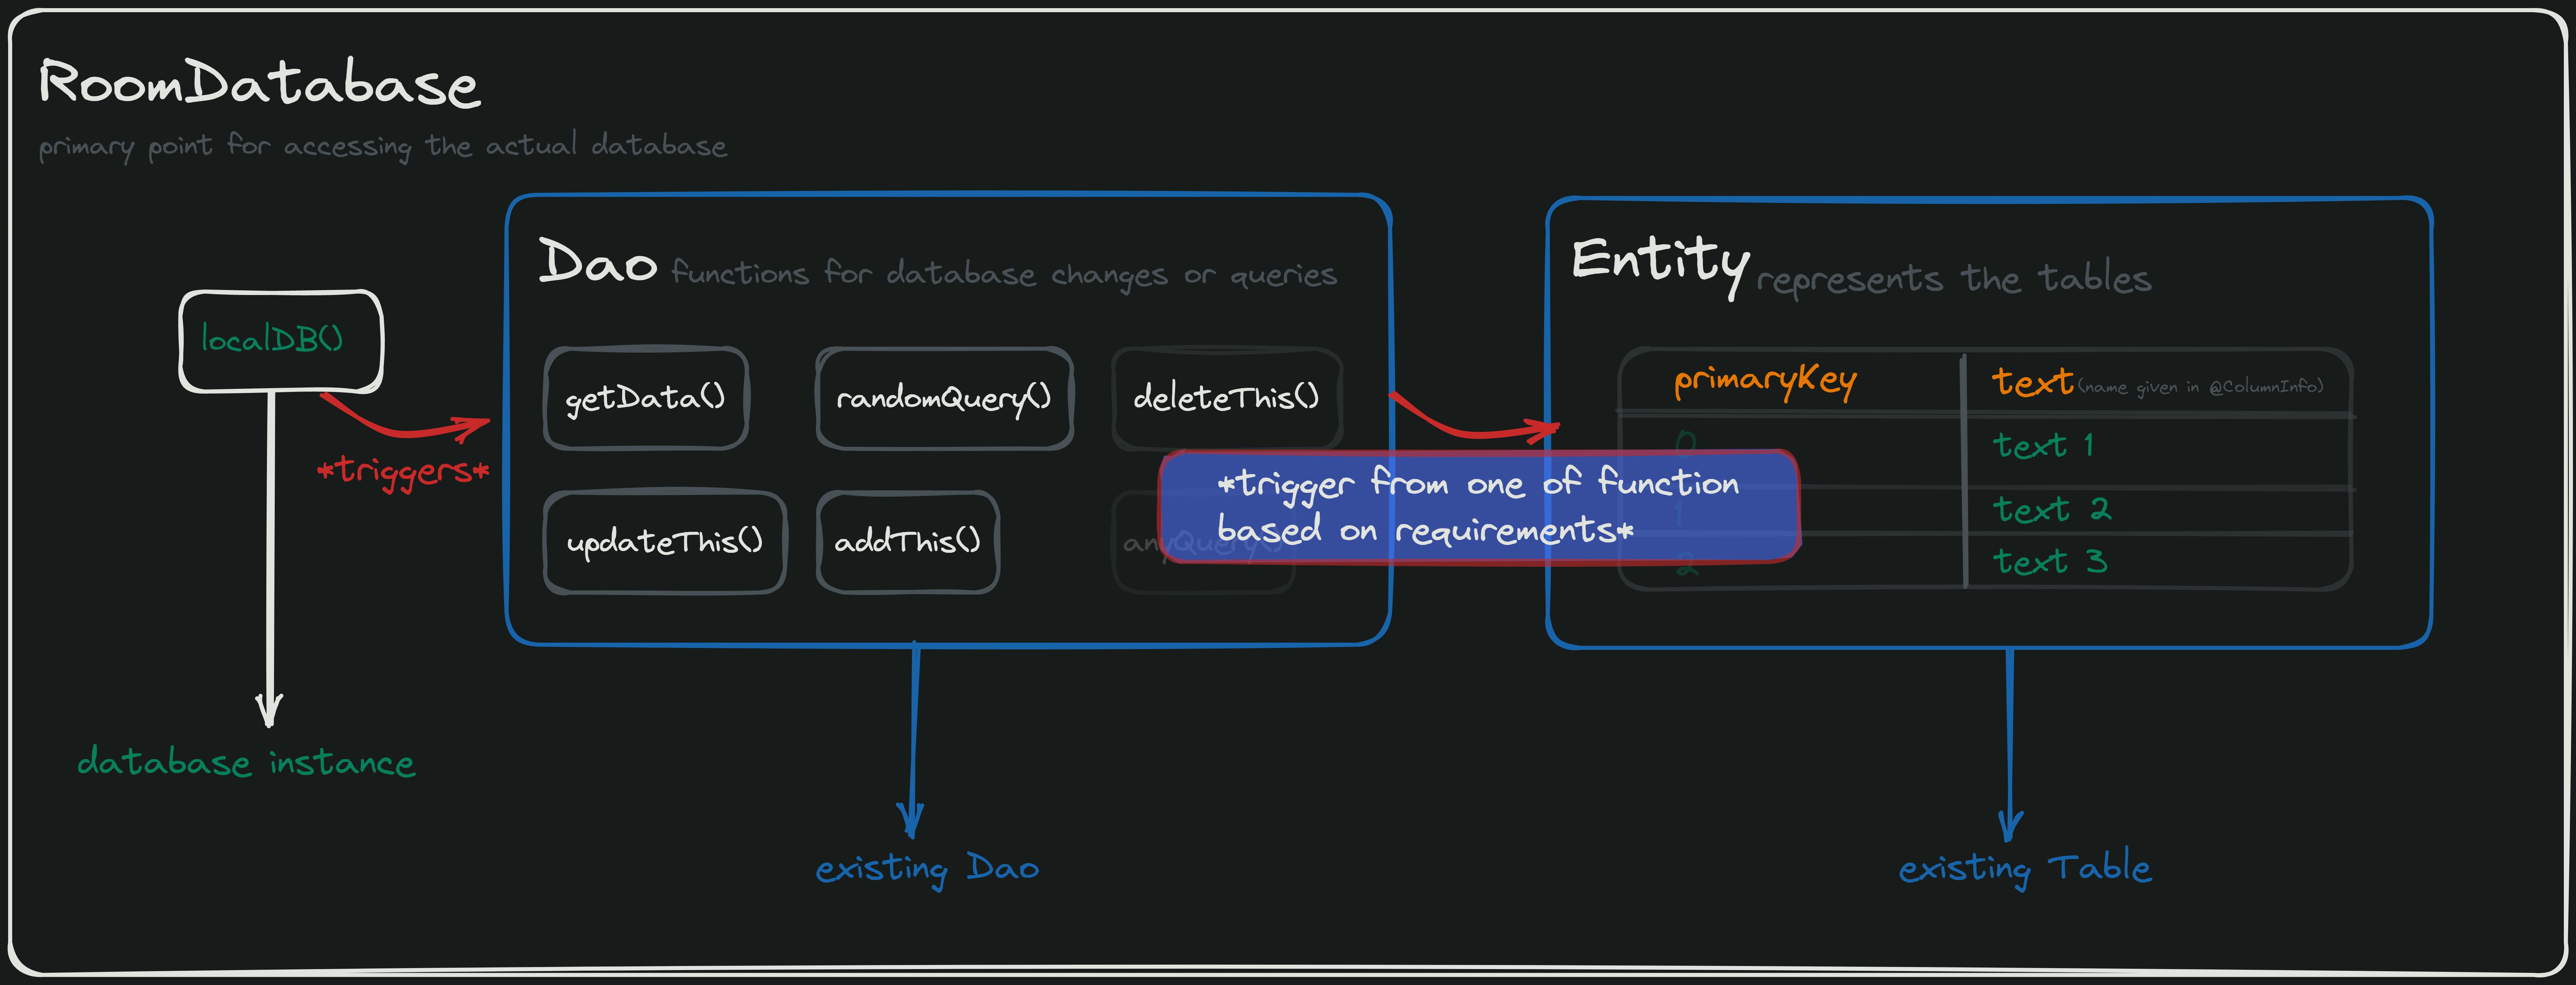
For representation, the above code, which represents the database entry point, will look like this:
Well, that's pretty much it. We have the database based on our requirements; the following example shows the practical scenario of using Room based on the above explanation.
Example 👨🏻💻, hack it
Primarily, we'll have a class that extends
ViewModel(), in which we'll fetch existing notes from the database that can be retrieved from the UI.We'll have
lateinit var databasefor working with the database across the app where we'll define the value for this variable in theMainActivityas we need to give thecontextingetLocalDB(context = )
The code may look like this:
class MainViewModel() : ViewModel() {
private val _existingNotes = MutableStateFlow<List<NotesDBDTO>>(emptyList())
val existingNotes = _existingNotes.asStateFlow()
companion object { // singleton for database access
lateinit var database: DataBase
}
private val coroutineExceptionHandler =
CoroutineExceptionHandler { _, throwable -> throwable.printStackTrace() }
init {
viewModelScope.launch(coroutineExceptionHandler) {
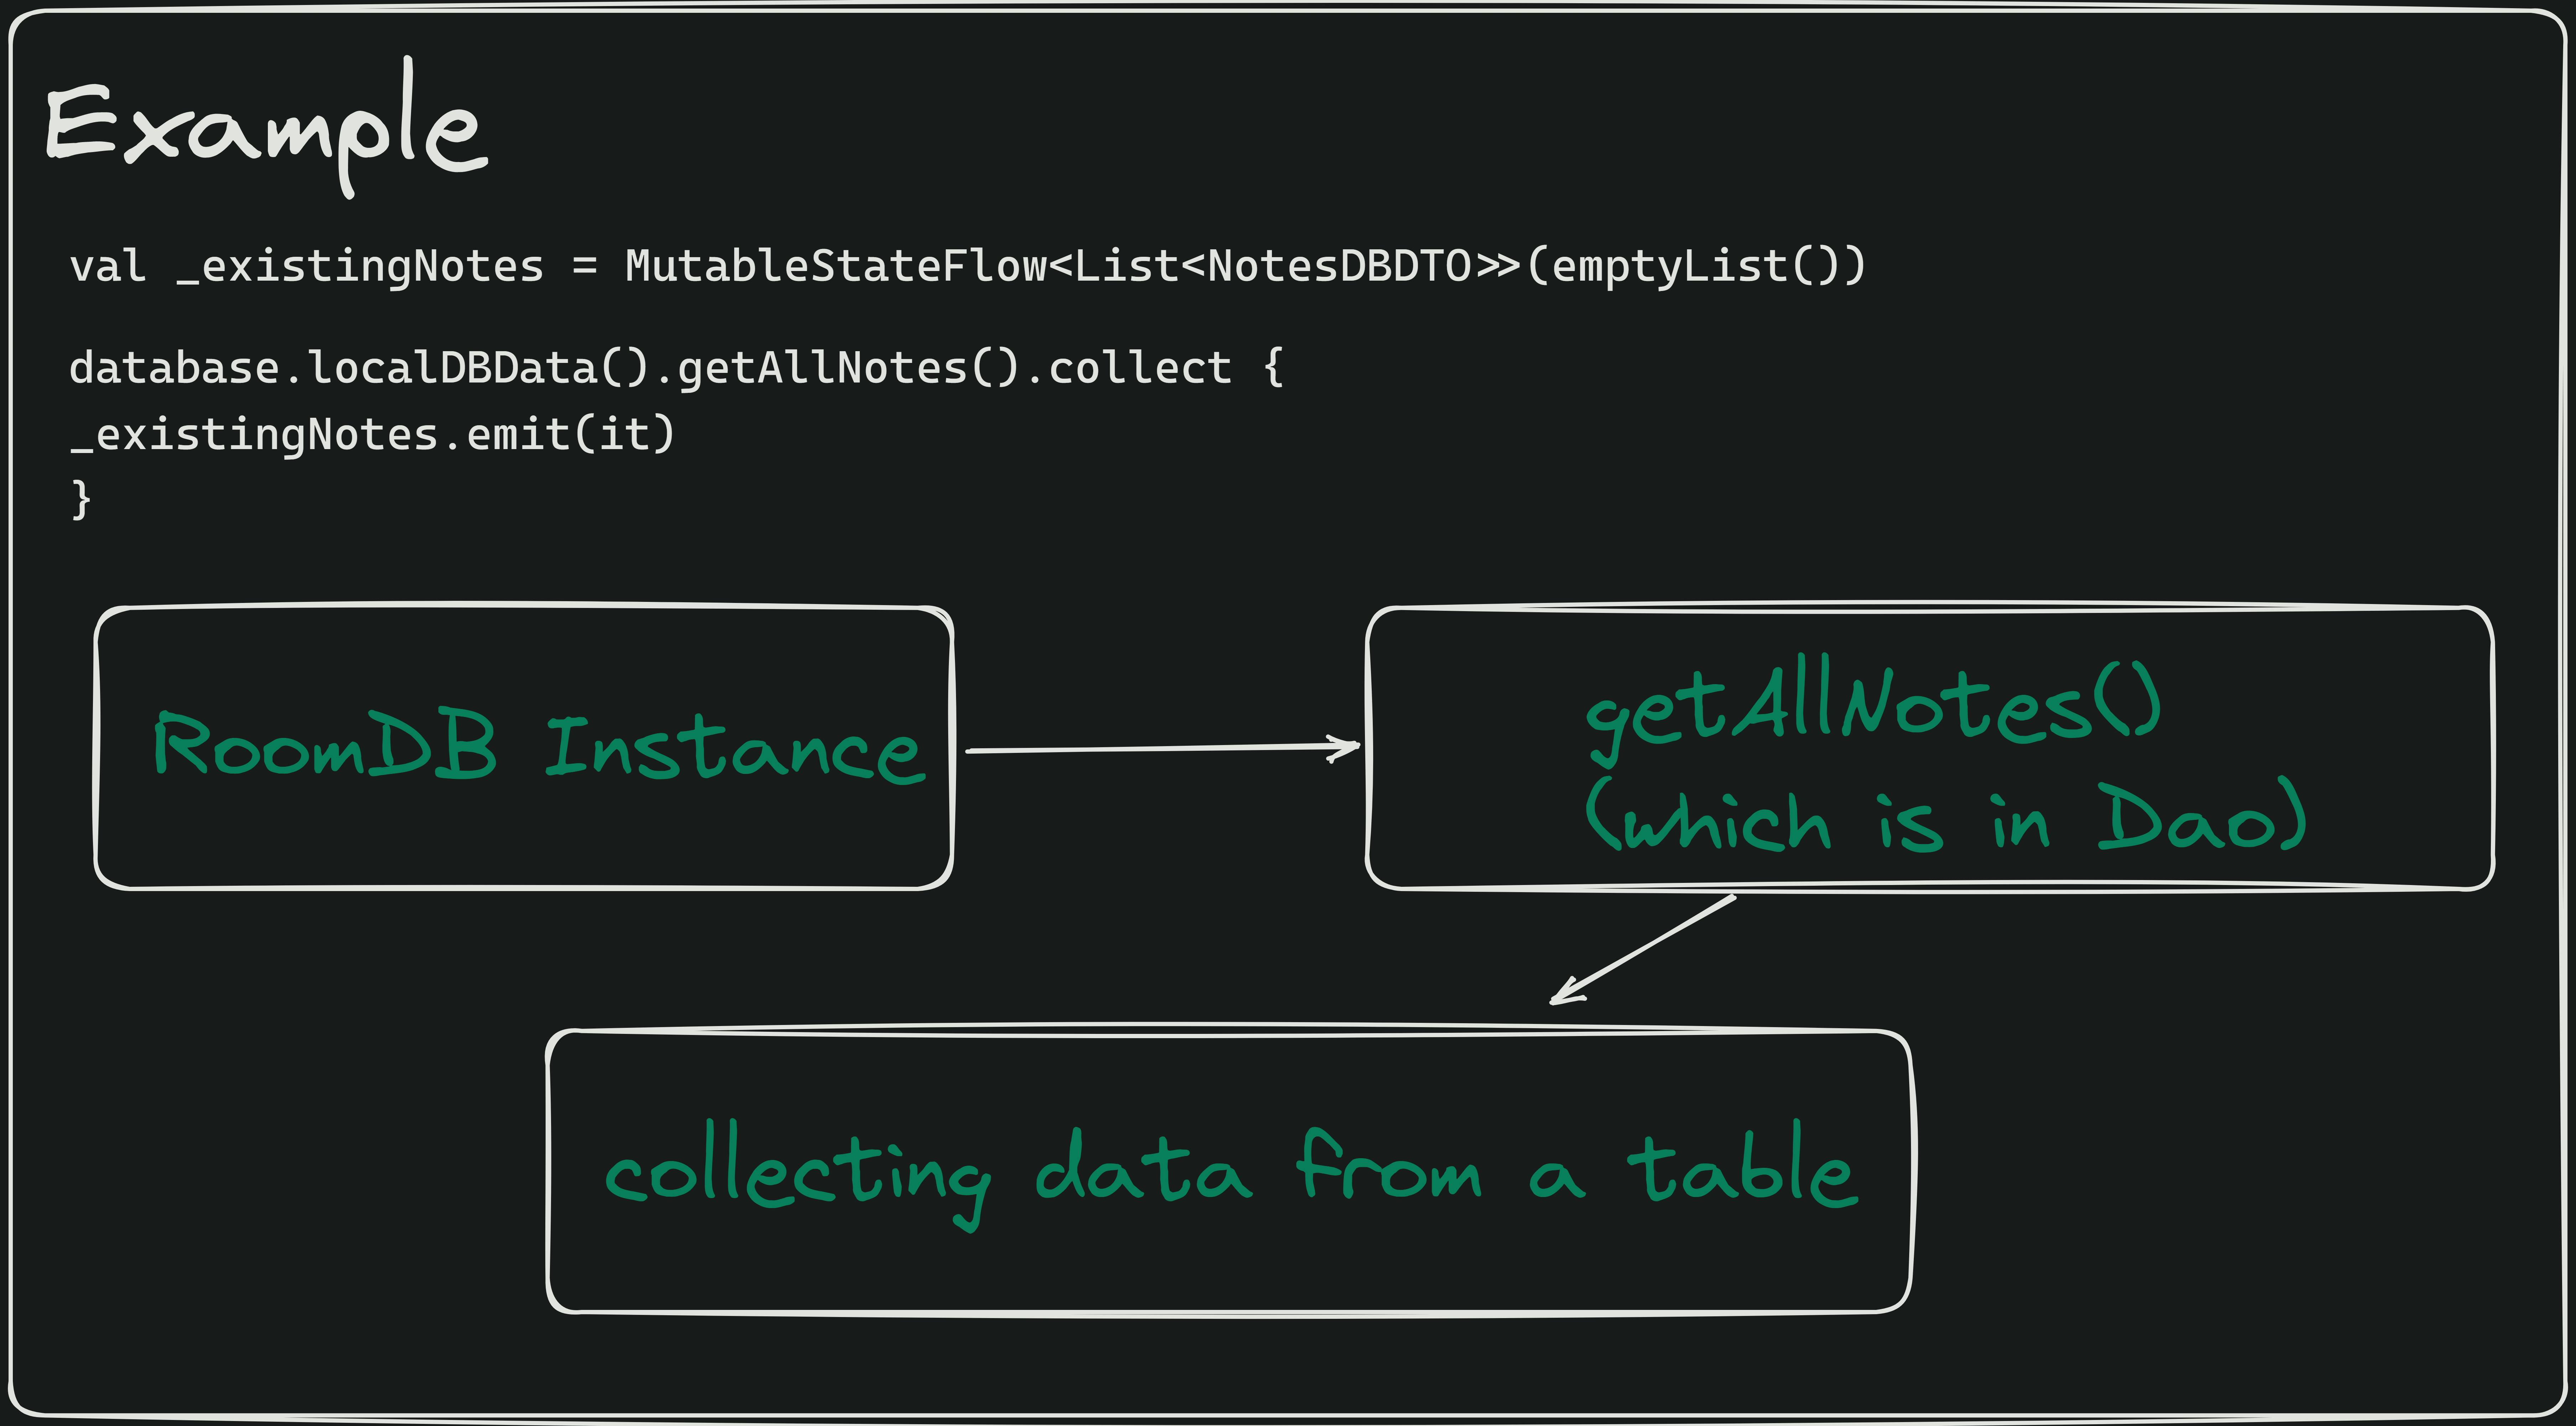
database.localDBData().getAllNotes().collect {
_existingNotes.emit(it)
}
}
}
}
For representation, the above code will look like this:
Code for updating existing data :
onClick{
coroutineScope.launch {
    MainViewModel.database.localDBData()
        .updateExistingNote(
        notesDBDTO = NotesDBDTO(
        _data = existingTextValue.value,
        primaryKey = primaryKey // working with `items()` in `LazyColumn`
            )
        )
    }
}
Code for adding new data :
onClick{
coroutineScope.launch {
    MainViewModel.database.localDBData()
            .addNewNote(notesDBDTO = NotesDBDTO(
        _data = textFieldValue.value,
        primaryKey = primaryKey
            )
        )
    }
}
Code for deleting existing data :
onClick{
coroutineScope.launch{
    MainViewModel.database.localDBData().
        deleteNote( notesDBDTO = NotesDBDTO(
         _data = it._data,
         primaryKey = it.primaryKey
            )
        )
    }
}
Note: I've used Jetpack Compose for the below example; you can use XML to build the UI, but the implementation for database logic would be the same.
Here's the example's result 🔥

That's all you need to know for getting started with Room in android😎🤝🏻, check out the following repository for the complete code for this blog:
Check out the following repository to see how a production app uses Room as a local database: