Getting Started With Coroutines In Kotlin
Light Weight Threads Which Is Perfectly Readable And Maintainable.
Before Getting Started You Must Know The Difference Between Main Thread And Background Thread:
Main Thread-> Main Thread Is Used To Handle All Those UI Updates In Your Android App. Main Thread Is Also Known As UI Thread As Its Main Work Is To Handle The UI Updates.
Background Thread-> Background Thread(s) Is Used To Handle Long-Running Operations In Your Android App [Eg: Loading Images From Backend, Running Any ML Algorithm, Network Access Etc..].
But Why Shouldn't We Handle Long-Running Operations From Main Thread🤔?
Implementing Long-running Operations/Tasks From The Main Thread Leads to Freezes And Unresponsiveness In Your Application.
In Conclusion, You Can Say That
Background Threads Are To Handle Long-running Operations/Tasks While The Main Thread Continues To Handle UI Updates.
But What Is The Purpose Of Coroutines Here😒?
Well, You Can Handle All Those Background Tasks/Operations With Coroutines In A Better Way.
Before Going To Further Watch This Clip To Understand How Thread(s) Helps Task(s) To Execute.

Clip Credits:- kotlinlang.org
Coroutines: Coroutines Is A Better Way To Write Asynchronous Code Which Is Perfectly Readable And As Well As Maintainable.
-> It is conceptually similar to a thread, in the sense that it takes a block of code to run that works concurrently with the rest of the code. But, a coroutine is not connected to any particular thread. It may suspend its execution in one thread and resume in another one.
Coroutines can be imagined as lightweight threads, but several important differences make their real-life usage very different from threads.
Let's Test Our First Coroutine:
Note: You Need To Import import kotlinx.coroutines.* To Get Started With Coroutines.
import kotlinx.coroutines.*

fun main()  = runBlocking { // this: CoroutineScope
    launch { // launching a new coroutine and continuing
        delay(5000L) // non-blocking delay for 5 second (default time unit is ms[milli second])
        println("Safe😷") // will be printed after delay
    }
    println("Stay") // main coroutine continues while a previous one is delayed
}
Run the Above code to get to your first working coroutine.
Your Output May Look Like This👇🏻
Stay
Safe😷
But What Does Our Code Mean🤔?
launch is a coroutine builder. It launches a new coroutine concurrently with the rest of the code, which continues to work independently. That's why Stay is printed first.
delay is a special suspending function. It delays the coroutine for a specific time [That Specific Time Should Be Provided In delay's parentheses (delay time in ms)]. Suspending a coroutine does not block the underlying thread, but allows other coroutines to run and use the underlying thread for their code.
runBlocking is also a coroutine builder that connects the non-coroutine code of a regular fun main() and the code with coroutines inside of runBlocking { ... } curly braces. This is highlighted in an IDE(s) by this: CoroutineScope hint, immediately after the runBlocking opening curly bracket.
->If You Remove or Skip runBlocking in this code, you'll get an error on the launch call, since launch is declared only in the CoroutineScope.
->Now, What Is Mean By CoroutineScope?
The scope simply provides lifecycle methods for coroutines and allows us to manage coroutines to start and stop them.
In Short: scope Provides lifecycle methods for coroutines and allows us to start and stop coroutines.
Every coroutine builder (like launch, async, etc) is an extension on CoroutineScope and inherits its coroutineContext to, automatically generates all its elements and cancellation.
We Have coroutineScope { } As Well Beside's launch and runBlocking.
->But How Can We Launch Coroutines In Android🤔?
->Before Moving To Further Make Sure That You Have Included Coroutines Dependency If It's Not Included:
implementation 'org.jetbrains.kotlinx:kotlinx-coroutines-android:1.5.0'
-We Can Launch A Coroutine By Assigning GlobalScope.launch{ } In Your Main Thread Or Any Other Coroutine:
override fun onCreate(savedInstanceState: Bundle?) {
        super.onCreate(savedInstanceState)
        setContentView(R.layout.activity_main)
        GlobalScope.launch {
            //Code
        }
    }
Note: You Should NOT Use GlobalScope every time.
->Let's Check If Our Coroutine Is Working Or Not By Assigning Log In Our Coroutine:
GlobalScope.launch {
            Log.d("coroutineCheck", "Running In ${Thread.currentThread().name}")
}
-> Run The Application And Open Logcat To Check The Result:

->And As You Can See That Log Is Executing In Background Thread.
Note: In Your Logcat, Dispatcher Worker's Numerical May Differ[Don't Worry About That].
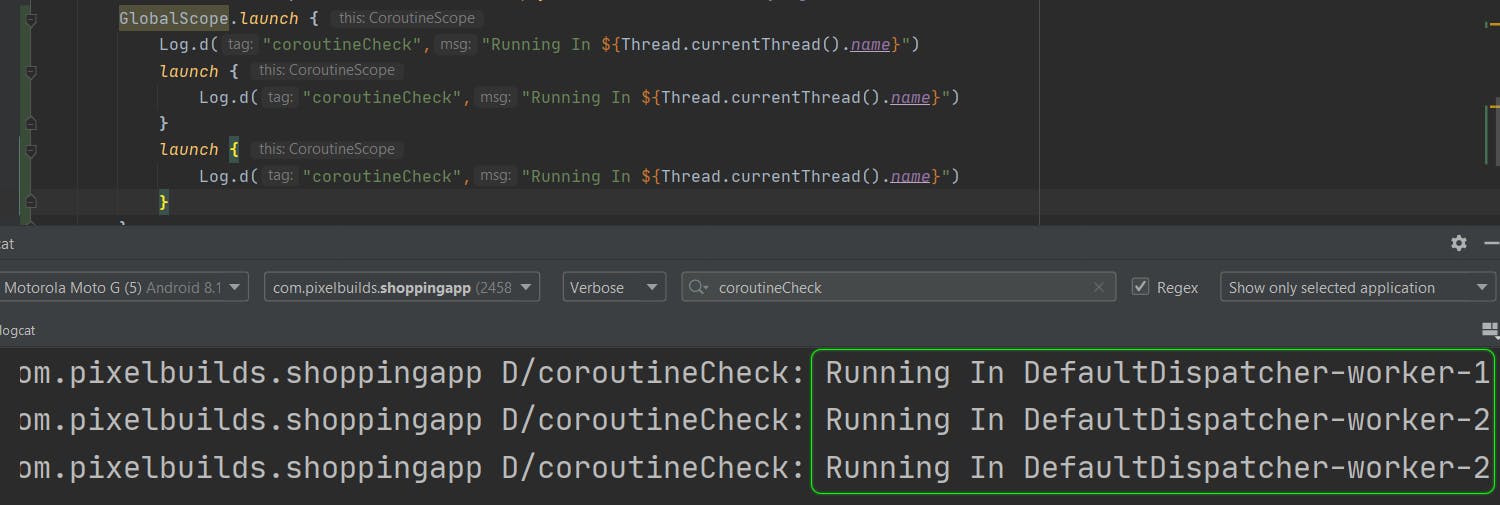
-> You Can Launch Multiple Coroutines From The Declared Coroutine Itself And You Don't Need To Specify Scope every time Inside The Declared Scope:
 GlobalScope.launch {
            Log.d("coroutineCheck","Running In ${Thread.currentThread().name}")
            launch {
                Log.d("coroutineCheck","Running In ${Thread.currentThread().name}")
            }
            launch {
                Log.d("coroutineCheck","Running In ${Thread.currentThread().name}")
            }
        }
-> Run The Application And Open Logcat To Check The Result:

->And As You Can See That Log Is Executing In Background Thread.
Note: In Your Logcat, Dispatcher Worker's Numerical May Differ[Don't Worry About That].
->Play Around With
delay()In The Coroutine😉
Well That's All For Now, In Upcoming Blog I'll Discuss About Suspend Function😉
Bye🤗
